
Optical Character Recognition (OCR) has revolutionized the way in which we work together with textual information in actual life, enabling machines to learn and interpret textual content from photos, scanned paperwork, and handwritten notes. From digitizing books and automating information entry to real-time textual content translation in augmented actuality, OCR functions are extremely various and impactful. A few of its software might embrace:
- Doc Digitization: Converts bodily paperwork into editable and searchable digital codecs.
- Bill Scanning: Extracts particulars like quantities, dates, and vendor names for automated processing.
- Information Entry Automation: Hastens workflows by extracting textual content from types and receipts.
- Actual-Time Translation: Interprets overseas textual content from photos or video streams in augmented actuality.
- License Plate Recognition: Identifies automobiles in site visitors methods and parking administration.
- Accessibility Instruments: Converts textual content to speech for visually impaired people.
- Archiving and Preservation: Digitizes historic paperwork for storage and analysis.
On this submit, we take OCR a step additional by constructing a customized OCR mannequin for recognizing textual content within the Wingdings font—a symbolic font with distinctive characters usually utilized in artistic and technical contexts. Whereas conventional OCR fashions are skilled for traditional textual content, this practice mannequin bridges the hole for area of interest functions, unlocking potentialities for translating symbolic textual content into readable English, whether or not for accessibility, design, or archival functions. By way of this, we exhibit the ability of OCR to adapt and cater to specialised use circumstances within the trendy world.
For builders and managers trying to streamline doc workflows corresponding to OCR extraction and past, instruments just like the Nanonets PDF AI provide precious integration choices. Coupled with state-of-the-art LLM capabilities, these can considerably improve your workflows, guaranteeing environment friendly information dealing with. Moreover, instruments like Nanonets’ PDF Summarizer can additional automate processes by summarizing prolonged paperwork.
Is There a Want for Customized OCR within the Age of Imaginative and prescient-Language Fashions?
Imaginative and prescient-language fashions, corresponding to Flamingo, Qwen2-VL, have revolutionized how machines perceive photos and textual content by bridging the hole between the 2 modalities. They’ll course of and cause about photos and related textual content in a extra generalized method.
Regardless of their spectacular capabilities, there stays a necessity for customized OCR methods in particular situations, primarily attributable to:
- Accuracy for Particular Languages or Scripts: Many vision-language fashions concentrate on widely-used languages. Customized OCR can tackle low-resource or regional languages, together with Indic scripts, calligraphy, or underrepresented dialects.
- Light-weight and Useful resource-Constrained Environments: Customized OCR fashions might be optimized for edge units with restricted computational energy, corresponding to embedded methods or cellular functions. Imaginative and prescient-language fashions, in distinction, are sometimes too resource-intensive for such use circumstances. For real-time or high-volume functions, corresponding to bill processing or automated doc evaluation, customized OCR options might be tailor-made for pace and accuracy.
- Information Privateness and Safety: Sure industries, corresponding to healthcare or finance, require OCR options that function offline or inside non-public infrastructures to satisfy strict information privateness laws. Customized OCR ensures compliance, whereas cloud-based vision-language fashions would possibly introduce safety issues.
- Price-Effectiveness: Deploying and fine-tuning large vision-language fashions might be cost-prohibitive for small-scale companies or particular initiatives. Customized OCR could be a extra reasonably priced and targeted different.
Construct a Customized OCR Mannequin for Wingdings
To discover the potential of customized OCR methods, we are going to construct an OCR engine particularly for the Wingdings font.
Under are the steps and parts we are going to comply with:
- Generate a customized dataset of Wingdings font photos paired with their corresponding labels in English phrases.
- Create a customized OCR mannequin able to recognizing symbols within the Wingdings font. We’ll use the Imaginative and prescient Transformer for Scene Textual content Recognition (ViTSTR), a state-of-the-art structure designed for image-captioning duties. Not like conventional CNN-based fashions, ViTSTR leverages the transformer structure, which excels at capturing long-range dependencies in photos, making it preferrred for recognizing advanced textual content constructions, together with the intricate patterns of Wingdings fonts.
- Practice the mannequin on the customized dataset of Wingdings symbols.
- Take a look at the mannequin on unseen information to judge its accuracy.
For this challenge, we are going to make the most of Google Colab for coaching, leveraging its 16 GB T4 GPU for quicker computation.
Making a Wingdings Dataset
What’s Wingdings?
Wingdings is a symbolic font developed by Microsoft that consists of a set of icons, shapes, and pictograms as an alternative of conventional alphanumeric characters. Launched in 1990, Wingdings maps keyboard inputs to graphical symbols, corresponding to arrows, smiley faces, checkmarks, and different ornamental icons. It’s usually used for design functions, visible communication, or as a playful font in digital content material.
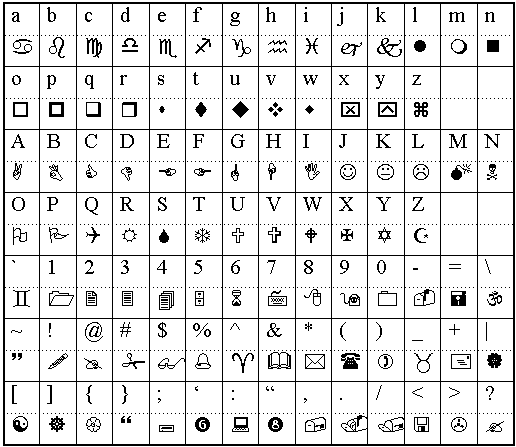
Because of its symbolic nature, deciphering Wingdings textual content programmatically poses a problem, making it an attention-grabbing use case for customized OCR methods.
Dataset Creation
Since no current dataset is obtainable for Optical Character Recognition (OCR) in Wingdings font, we created one from scratch. The method entails producing photos of phrases within the Wingdings font and mapping them to their corresponding English phrases.
To realize this, we used the Wingdings Translator to transform English phrases into their Wingdings representations. For every transformed phrase, a picture was manually generated and saved in a folder named “wingdings_word_images”.
Moreover, we create a “metadata.csv” file to keep up a structured document of the dataset together with the picture path. This file accommodates two columns:
- Picture Path: Specifies the file path for every picture within the dataset.
- English Phrase: Lists the corresponding English phrase for every Wingdings illustration.
The dataset might be downloaded from this link.
Preprocessing the Dataset
The photographs within the dataset fluctuate in measurement as a result of guide creation course of. To make sure uniformity and compatibility with OCR fashions, we preprocess the pictures by resizing and padding them.
import pandas as pd
import numpy as np
from PIL import Picture
import os
from tqdm import tqdm

def pad_image(picture, target_size=(224, 224)):
    """Pad picture to focus on measurement whereas sustaining facet ratio"""
    if picture.mode != 'RGB':
        picture = picture.convert('RGB')

    # Get present measurement
    width, peak = picture.measurement

    # Calculate padding
    aspect_ratio = width / peak
    if aspect_ratio > 1:
        # Width is bigger
        new_width = target_size[0]
        new_height = int(new_width / aspect_ratio)
    else:
        # Top is bigger
        new_height = target_size[1]
        new_width = int(new_height * aspect_ratio)

    # Resize picture sustaining facet ratio
    picture = picture.resize((new_width, new_height), Picture.Resampling.LANCZOS)

    # Create new picture with padding
    new_image = Picture.new('RGB', target_size, (255, 255, 255))

    # Paste resized picture in middle
    paste_x = (target_size[0] - new_width) // 2
    paste_y = (target_size[1] - new_height) // 2
    new_image.paste(picture, (paste_x, paste_y))

    return new_image

# Learn the metadata
df = pd.read_csv('metadata.csv')

# Create output listing for processed photos
processed_dir="processed_images"
os.makedirs(processed_dir, exist_ok=True)

# Course of every picture
new_paths = []
for idx, row in tqdm(df.iterrows(), whole=len(df), desc="Processing photos"):
    # Load picture
    img_path = row['image_path']
    img = Picture.open(img_path)

    # Pad picture
    processed_img = pad_image(img)

    # Save processed picture
    new_path = os.path.be a part of(processed_dir, f'processed_{os.path.basename(img_path)}')
    processed_img.save(new_path)
    new_paths.append(new_path)

# Replace dataframe with new paths
df['processed_image_path'] = new_paths
df.to_csv('processed_metadata.csv', index=False)

print("Picture preprocessing accomplished!")
print(f"Whole photos processed: {len(df)}")
First, every picture is resized to a set peak whereas sustaining its facet ratio to protect the visible construction of the Wingdings characters. Subsequent, we apply padding to make all photos the identical dimensions, usually a sq. form, to suit the enter necessities of neural networks. The padding is added symmetrically across the resized picture, with the background colour matching the unique picture’s background.
Splitting the Dataset
The dataset is split into three subsets: coaching (70%), validation (dev) (15%), and testing (15%). The coaching set is used to show the mannequin, the validation set helps fine-tune hyperparameters and monitor overfitting, and the check set evaluates the mannequin’s efficiency on unseen information. This random cut up ensures every subset is various and consultant, selling efficient generalization.
import pandas as pd
from sklearn.model_selection import train_test_split

# Learn the processed metadata
df = pd.read_csv('processed_metadata.csv')

# First cut up: practice and short-term
train_df, temp_df = train_test_split(df, train_size=0.7, random_state=42)

# Second cut up: validation and check from short-term
val_df, test_df = train_test_split(temp_df, train_size=0.5, random_state=42)

# Save splits to CSV
train_df.to_csv('practice.csv', index=False)
val_df.to_csv('val.csv', index=False)
test_df.to_csv('check.csv', index=False)

print("Information cut up statistics:")
print(f"Coaching samples: {len(train_df)}")
print(f"Validation samples: {len(val_df)}")
print(f"Take a look at samples: {len(test_df)}")
Visualizing the Dataset
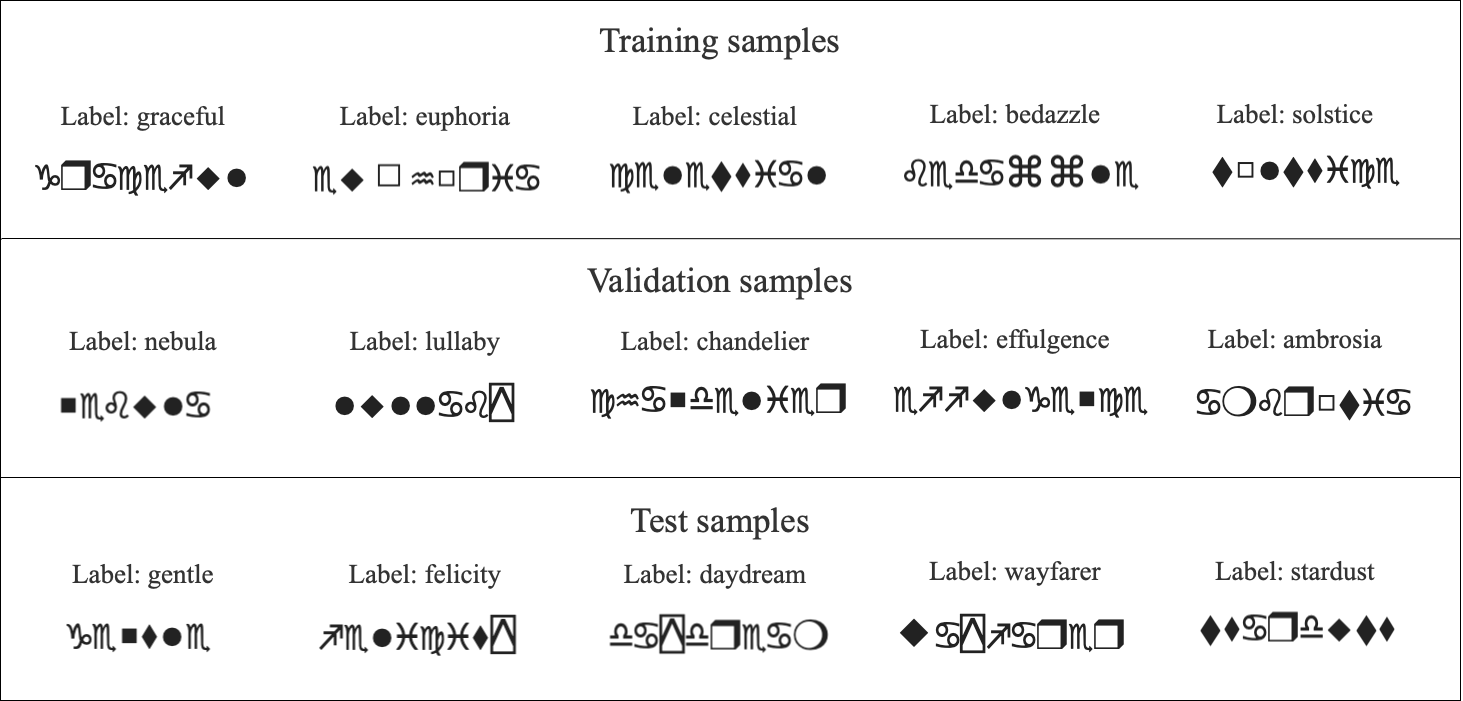
To higher perceive the dataset, we visualize samples from every cut up. Particularly, we show 5 examples from the coaching set, 5 from the validation set, and 5 from the check set. Every visualization contains the Wingdings textual content as a picture alongside its corresponding label in English. This step offers a transparent overview of the info distribution throughout the splits and ensures the correctness of the dataset mappings.
import matplotlib.pyplot as plt
from PIL import Picture
import pandas as pd

def plot_samples(df, num_samples=5, title="Pattern Pictures"):
    # Set bigger font sizes
    plt.rcParams.replace({
        'font.measurement': 14,          # Base font measurement
        'axes.titlesize': 16,     # Subplot title font measurement
        'determine.titlesize': 20    # Essential title font measurement
    })

    fig, axes = plt.subplots(1, num_samples, figsize=(20, 4))
    fig.suptitle(title, fontsize=20, y=1.05)

    # Randomly pattern photos
    sample_df = df.pattern(n=num_samples)

    for idx, (_, row) in enumerate(sample_df.iterrows()):
        img = Picture.open(row['processed_image_path'])
        axes[idx].imshow(img)
        axes[idx].set_title(f"Label: {row['english_word_label']}", fontsize=16, pad=10)
        axes[idx].axis('off')

    plt.tight_layout()
    plt.present()

# Load splits
train_df = pd.read_csv('practice.csv')
val_df = pd.read_csv('val.csv')
test_df = pd.read_csv('check.csv')

# Plot samples from every cut up
plot_samples(train_df, title="Coaching Samples")
plot_samples(val_df, title="Validation Samples")
plot_samples(test_df, title="Take a look at Samples")
Samples from the info are visualised as:
Practice an OCR Mannequin
First we have to import the required libraries and dependencies:
import torch
import torch.nn as nn
from torch.utils.information import Dataset, DataLoader
from transformers import VisionEncoderDecoderModel, ViTImageProcessor, AutoTokenizer
from PIL import Picture
import pandas as pd
from tqdm import tqdm
Mannequin Coaching with ViTSTR
We use a Imaginative and prescient Encoder-Decoder mannequin, particularly ViTSTR (Imaginative and prescient Transformer for Scene Textual content Recognition). We fine-tune it for our Wingdings OCR job. The encoder processes the Wingdings textual content photos utilizing a ViT (Imaginative and prescient Transformer) spine, whereas the decoder generates the corresponding English phrase labels.
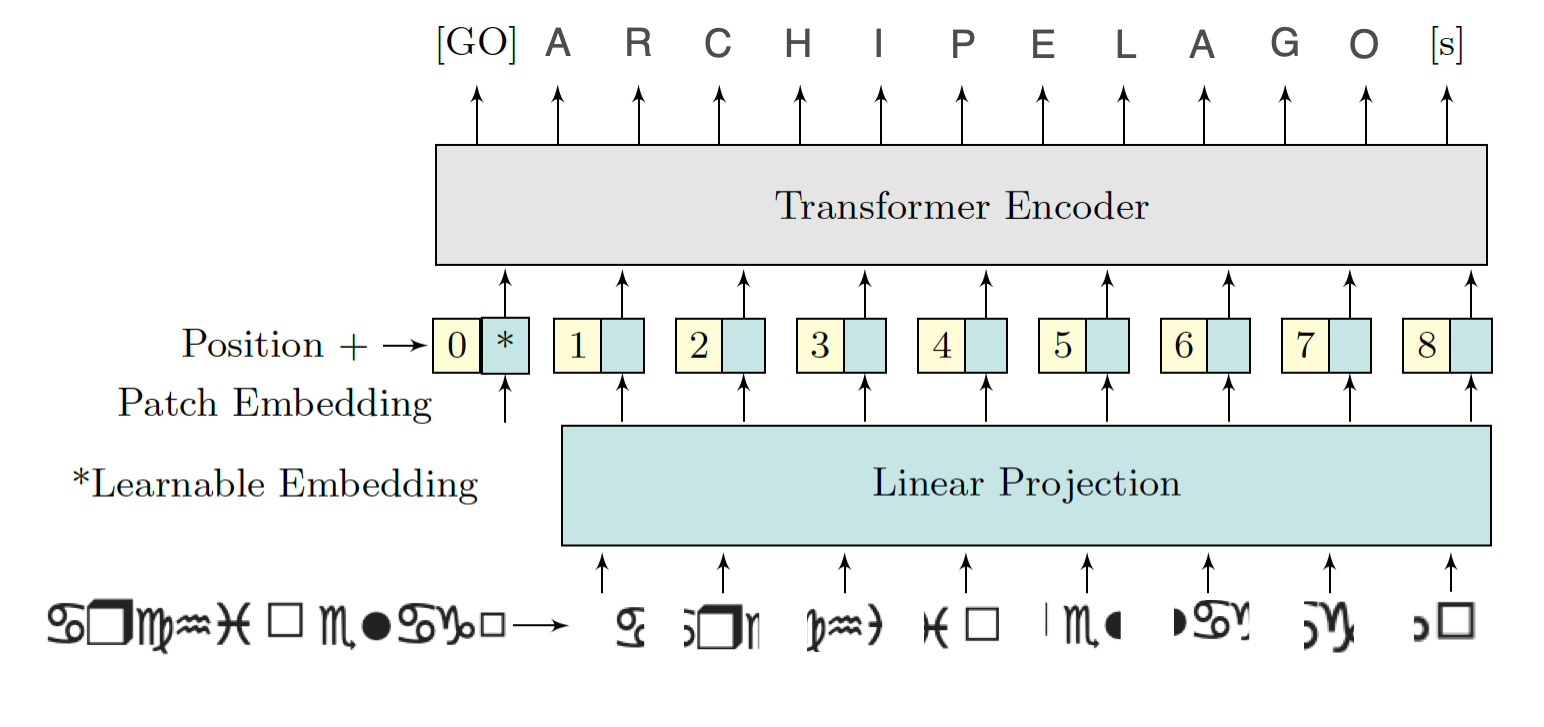
Throughout coaching, the mannequin learns to map pixel-level data from the pictures to significant English textual content. The coaching and validation losses are monitored to evaluate mannequin efficiency, guaranteeing it generalizes nicely. After coaching, the fine-tuned mannequin is saved for inference on unseen Wingdings textual content photos. We use pre-trained parts from Hugging Face for our OCR pipeline and high-quality tune them. The ViTImageProcessor prepares photos for the Imaginative and prescient Transformer (ViT) encoder, whereas the bert-base-uncased tokenizer processes English textual content labels for the decoder. The VisionEncoderDecoderModel, combining a ViT encoder and GPT-2 decoder, is fine-tuned for picture captioning duties, making it preferrred for studying the Wingdings-to-English mapping.
class WingdingsDataset(Dataset):
    def __init__(self, csv_path, processor, tokenizer):
        self.df = pd.read_csv(csv_path)
        self.processor = processor
        self.tokenizer = tokenizer

    def __len__(self):
        return len(self.df)

    def __getitem__(self, idx):
        row = self.df.iloc[idx]
        picture = Picture.open(row['processed_image_path'])
        label = row['english_word_label']

        # Course of picture
        pixel_values = self.processor(picture, return_tensors="pt").pixel_values

        # Course of label
        encoding = self.tokenizer(
            label,
            padding="max_length",
            max_length=16,
            truncation=True,
            return_tensors="pt"
        )

        return {
            'pixel_values': pixel_values.squeeze(),
            'labels': encoding.input_ids.squeeze(),
            'textual content': label
        }

def train_epoch(mannequin, dataloader, optimizer, machine):
    mannequin.practice()
    total_loss = 0
    progress_bar = tqdm(dataloader, desc="Coaching")

    for batch in progress_bar:
        pixel_values = batch['pixel_values'].to(machine)
        labels = batch['labels'].to(machine)

        outputs = mannequin(pixel_values=pixel_values, labels=labels)
        loss = outputs.loss

        optimizer.zero_grad()
        loss.backward()
        optimizer.step()

        total_loss += loss.merchandise()
        progress_bar.set_postfix({'loss': loss.merchandise()})

    return total_loss / len(dataloader)

def validate(mannequin, dataloader, machine):
    mannequin.eval()
    total_loss = 0

    with torch.no_grad():
        for batch in tqdm(dataloader, desc="Validating"):
            pixel_values = batch['pixel_values'].to(machine)
            labels = batch['labels'].to(machine)

            outputs = mannequin(pixel_values=pixel_values, labels=labels)
            loss = outputs.loss
            total_loss += loss.merchandise()

    return total_loss / len(dataloader)

# Initialize fashions and tokenizers
processor = ViTImageProcessor.from_pretrained("google/vit-base-patch16-224-in21k")
tokenizer = AutoTokenizer.from_pretrained("bert-base-uncased")
mannequin = VisionEncoderDecoderModel.from_pretrained("nlpconnect/vit-gpt2-image-captioning")

# Create datasets
train_dataset = WingdingsDataset('practice.csv', processor, tokenizer)
val_dataset = WingdingsDataset('val.csv', processor, tokenizer)

# Create dataloaders
train_loader = DataLoader(train_dataset, batch_size=32, shuffle=True)
val_loader = DataLoader(val_dataset, batch_size=32)

# Setup coaching
machine = torch.machine('cuda' if torch.cuda.is_available() else 'cpu')
mannequin = mannequin.to(machine)
optimizer = torch.optim.AdamW(mannequin.parameters(), lr=5e-5)
num_epochs = 20 #(change based on want)

# Coaching loop
for epoch in vary(num_epochs):
    print(f"nEpoch {epoch+1}/{num_epochs}")

    train_loss = train_epoch(mannequin, train_loader, optimizer, machine)
    val_loss = validate(mannequin, val_loader, machine)

    print(f"Coaching Loss: {train_loss:.4f}")
    print(f"Validation Loss: {val_loss:.4f}")

# Save the mannequin
mannequin.save_pretrained('wingdings_ocr_model')
print("nTraining accomplished and mannequin saved!")
The coaching is carried for 20 epochs in Google Colab. Though it provides honest outcome with 20 epochs, it is a hyper parameter and might be elevated to achieve higher accuracy. Dropout, Picture Augmentation and Batch Normalization are a couple of extra hyper-parameters one can play with to make sure mannequin is just not overfitting. The coaching stats and the loss and accuracy curve for practice and validation units on first and final epochs are given beneath:
Epoch 1/20
Coaching: 100%|██████████| 22/22 [00:36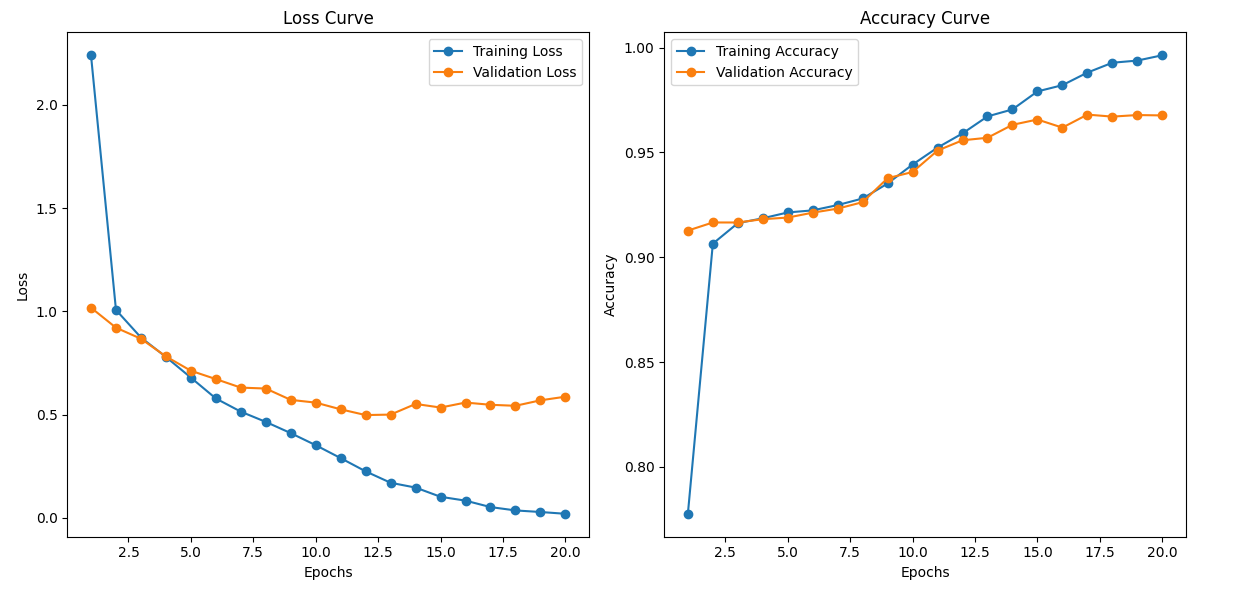
Using the Saved Model
Once the model has been trained and saved, you can easily load it for inference on new Wingdings images. The test.csv file created during preprocessing is used to create the test_dataset. Here’s the code to load the saved model and make predictions:
# Load the trained model
model = VisionEncoderDecoderModel.from_pretrained('wingdings_ocr_model')
processor = ViTImageProcessor.from_pretrained("google/vit-base-patch16-224-in21k")
tokenizer = AutoTokenizer.from_pretrained("bert-base-uncased")

# Create test dataset and dataloader
test_dataset = WingdingsDataset('test.csv', processor, tokenizer)
test_loader = DataLoader(test_dataset, batch_size=32)
Model Evaluation
After training, we evaluate the model’s performance on the test split to measure its performance. To gain insights into the model’s performance, we randomly select 10 samples from the test split. For each sample, we display the true label (English word) alongside the model’s prediction and check if they match.
import seaborn as sns
import matplotlib.pyplot as plt
from PIL import Image

def plot_prediction_samples(image_paths, true_labels, pred_labels, num_samples=10):
    # Set figure size and font sizes
    plt.rcParams.update({
        'font.size': 14,
        'axes.titlesize': 18,
        'figure.titlesize': 22
    })

    # Calculate grid dimensions
    num_rows = 2
    num_cols = 5
    num_samples = min(num_samples, len(image_paths))

    # Create figure
    fig, axes = plt.subplots(num_rows, num_cols, figsize=(20, 8))
    fig.suptitle('Sample Predictions from Test Set', fontsize=22, y=1.05)

    # Flatten axes for easier indexing
    axes_flat = axes.flatten()

    for i in range(num_samples):
        ax = axes_flat[i]

        # Load and show picture
        img = Picture.open(image_paths[i])
        ax.imshow(img)

        # Create label textual content
        true_text = f"True: {true_labels[i]}"
        pred_text = f"Pred: {pred_labels[i]}"

        # Set colour based mostly on correctness
        colour="inexperienced" if true_labels[i] == pred_labels[i] else 'pink'

        # Add textual content above picture
        ax.set_title(f"{true_text}n{pred_text}",
                    fontsize=14,
                    colour=colour,
                    pad=10,
                    bbox=dict(facecolor="white",
                             alpha=0.8,
                             edgecolor="none",
                             pad=3))

        # Take away axes
        ax.axis('off')

    # Take away any empty subplots
    for i in vary(num_samples, num_rows * num_cols):
        fig.delaxes(axes_flat[i])

    plt.tight_layout()
    plt.present()

# Analysis
machine = torch.machine('cuda' if torch.cuda.is_available() else 'cpu')
mannequin = mannequin.to(machine)
mannequin.eval()

predictions = []
ground_truth = []
image_paths = []

with torch.no_grad():
    for batch in tqdm(test_loader, desc="Evaluating"):
        pixel_values = batch['pixel_values'].to(machine)
        texts = batch['text']

        outputs = mannequin.generate(pixel_values)
        pred_texts = tokenizer.batch_decode(outputs, skip_special_tokens=True)

        predictions.prolong(pred_texts)
        ground_truth.prolong(texts)
        image_paths.prolong([row['processed_image_path'] for _, row in test_dataset.df.iterrows()])

# Calculate and print accuracy
accuracy = accuracy_score(ground_truth, predictions)
print(f"nTest Accuracy: {accuracy:.4f}")

# Show pattern predictions in grid
print("nDisplaying pattern predictions:")
plot_prediction_samples(image_paths, ground_truth, predictions)
The analysis provides the next output:
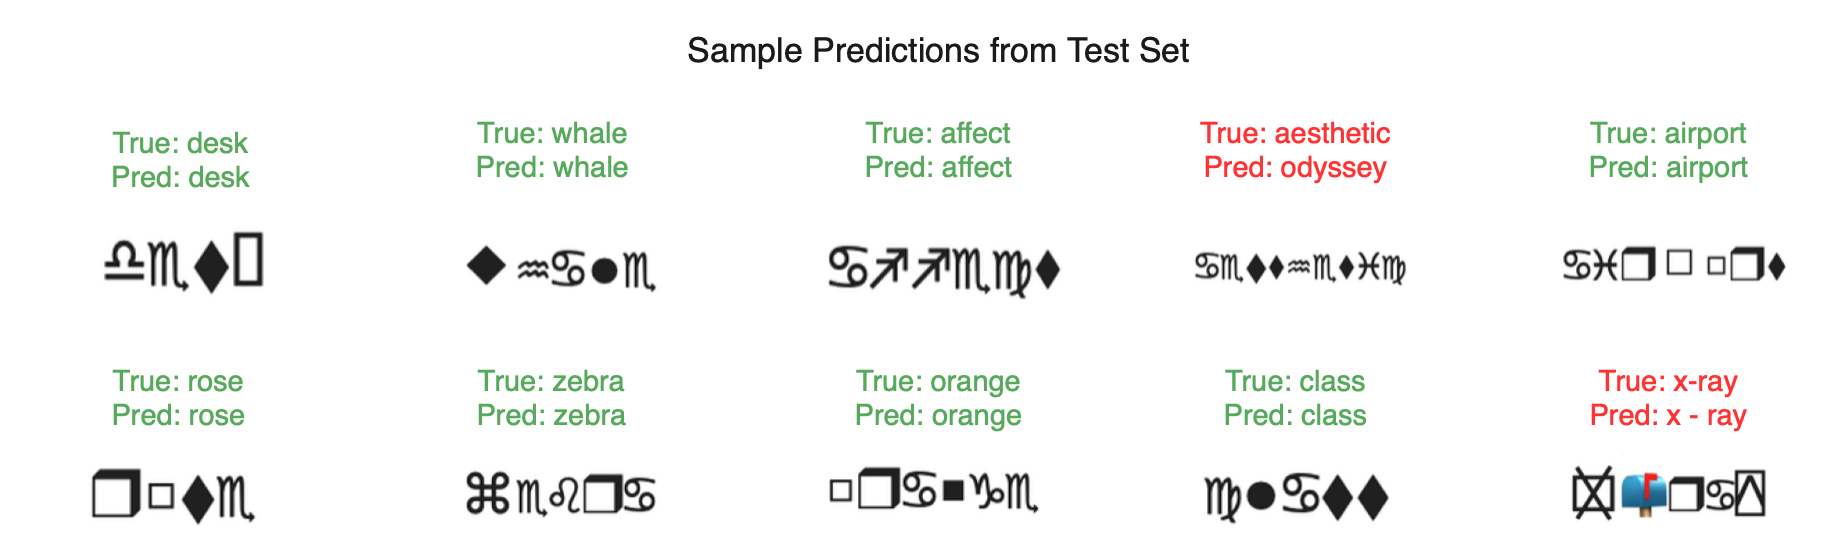
Analysing the output given by the mannequin, we discover that the predictions match the reference/unique labels pretty nicely. Though the final prediction is appropriate it’s displayed in pink due to the areas within the generated textual content.
All of the code and dataset used above might be discovered on this Github repository. And the top to finish coaching might be discovered within the following colab pocket book
Dialogue
Once we see the outputs, it turns into clear that the mannequin performs very well. The anticipated labels are correct, and the visible comparability with the true labels demonstrates the mannequin’s sturdy functionality in recognizing the proper courses.
The mannequin’s wonderful efficiency may very well be attributed to the sturdy structure of the Imaginative and prescient Transformer for Scene Textual content Recognition (ViTSTR). ViTSTR stands out attributable to its means to seamlessly mix the ability of Imaginative and prescient Transformers (ViT) with language fashions for textual content recognition duties.
A comparability may very well be made by experimenting with completely different ViT structure sizes, corresponding to various the variety of layers, embedding dimensions, or the variety of consideration heads. Fashions like ViT-Base, ViT-Massive, and ViT-Big might be examined, together with different architectures like:
- DeiT (Information-efficient Picture Transformer)
- Swin Transformer
By evaluating these fashions of various scales, we will determine which structure is essentially the most environment friendly by way of efficiency and computational assets. This may assist decide the optimum mannequin measurement that balances accuracy and effectivity for the given job.
For duties like extracting data from paperwork, instruments corresponding to Nanonets’ Chat with PDF have evaluated and used a number of state of the LLMs together with customized in-house skilled fashions and might provide a dependable solution to work together with content material, guaranteeing correct information extraction with out danger of misrepresentation.